
Technical Tip
You can also allocate a payment to a finance company using POS Docket Creation – see "Finalise Pay - Allocate" and "Order Confirmation Pay - Allocate".
Use this option to allocate all or part of a payment to a finance company before printing a tax invoice for a sales order.
|
|
|
Technical Tip You can also allocate a payment to a finance company using POS Docket Creation – see "Finalise Pay - Allocate" and "Order Confirmation Pay - Allocate". |
Refer to "Order Details - Invoice - Print".
|
|
|
Technical Tip You can also display the POS Scheduler Pay screen when processing but not printing an invoice (refer to "Order Details - Invoice - No Print") and when processing a payment (refer to "Order Details - Payment"). |
Micronet displays the POS Allocations screen.

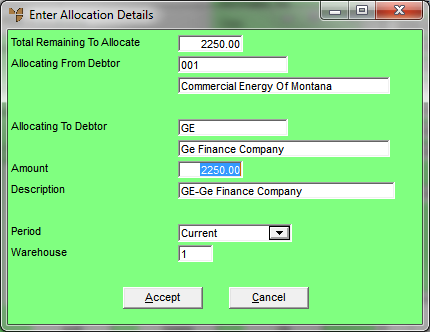
If you selected to add or edit a finance company allocation, Micronet displays the Enter Allocation Details screen.
|
|
Field |
Value |
|---|---|---|
|
|
Total Remaining To Allocate |
Micronet displays the total outstanding invoice amount. |
|
|
Allocating From Debtor |
Micronet displays the debtor the sales order is for. |
|
|
Allocating To Debtor |
Enter the ID of the finance company debtor or press Enter to select the finance company. |
|
|
|
Reference You can only select debtors where the Account Status is set to enPOS Allocations in the Debtor master file – see "File - Debtor - Hold". |
|
|
Amount |
Check that this field displays the correct amount to be allocated, or change the amount if required. |
|
|
Description |
Enter the customer name and sales order number. This information is displayed on the debtor account inquiry and assists in identifying the transaction when the payment is received. |
|
|
Period |
Select the period that this finance company allocation should be posted to. |
|
|
Warehouse |
Micronet displays the warehouse for the debtor. You can delete this and enter another warehouse if required, or press Enter to select a warehouse. |
Micronet redisplays the POS Allocations screen.
Micronet redisplays the POS Scheduler Pay screen with the total amount allocated in the Allocated field.
Refer to "Order Details - Invoice - Print" for more information.
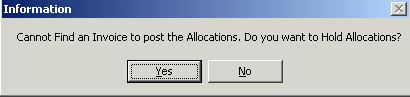
When the invoice is processed, the allocations will automatically generate credit journals against the customer and debit journals for the finance company. However, if there is no invoice number, Micronet displays an information screen advising that an invoice is needed to post the allocation against, and asking if the allocation should be held.
The debit journals will contain the invoice number the allocations were created against in the Order Number field, and the description with the customer’s name as entered in the Enter Allocation Details screen.
The credit journals will be posted against the last invoice number created for the POS order.
